Everything you need to consider before adding a pot filler to your Wood Streets kitchen remodel
Adding a pot filler to your Wood Streets kitchen remodel sounds like a simple luxury upgrade but the reality involves complex plumbing decisions that many homeowners overlook. The Wood Streets area of Riverside features charming historic homes with unique wall construction and existing plumbing layouts that can make pot filler installation surprisingly challenging. Before you fall in love with that brushed nickel faucet at the showroom you need to understand the technical requirements permit needs and potential complications specific to your 1940s or 1950s home. Why homeowners in Orangecrest are upgrading to tankless water heaters this year.
Understanding your Wood Streets home’s plumbing infrastructure
Wood Streets homes typically feature galvanized steel or early copper plumbing systems that may be nearing the end of their useful life. These materials behave differently than modern PEX or PVC when you try to add new fixtures. Galvanized pipes can have internal corrosion that reduces water flow and creates pressure issues when you tap into existing lines for a new pot filler. Before any installation you need to know what type of pipe feeds your kitchen and whether it can handle the additional demand. The most common plumbing emergencies in La Sierra and how to solve them.
The water pressure in Wood Streets varies significantly depending on your home’s elevation relative to the main supply lines. Homes on the higher elevation near Mount Rubidoux Park often experience lower pressure that may not support a pot filler operating at full capacity. A professional plumber needs to test your static and dynamic water pressure before recommending any installation approach. How to find a local plumber in Mission Grove who actually answers the phone.
Building code requirements for Riverside kitchen modifications
California Plumbing Code Section 604.8 requires that any new plumbing fixture installation meet specific water efficiency and safety standards. For pot fillers this means ensuring the fixture has an aerator that restricts flow to 1.5 gallons per minute or less. The Riverside County Department of Building and Safety also mandates that any modification to existing plumbing systems requires a permit regardless of the fixture type. Emergency Water Shut-Off Service.
Local seismic requirements add another layer of complexity. Riverside County Building Code Section 1909.4 requires that all water supply piping in residential structures be properly braced to prevent damage during earthquakes. This means your pot filler installation needs additional support brackets if you’re mounting it on an exterior wall or in an area with known soil movement.
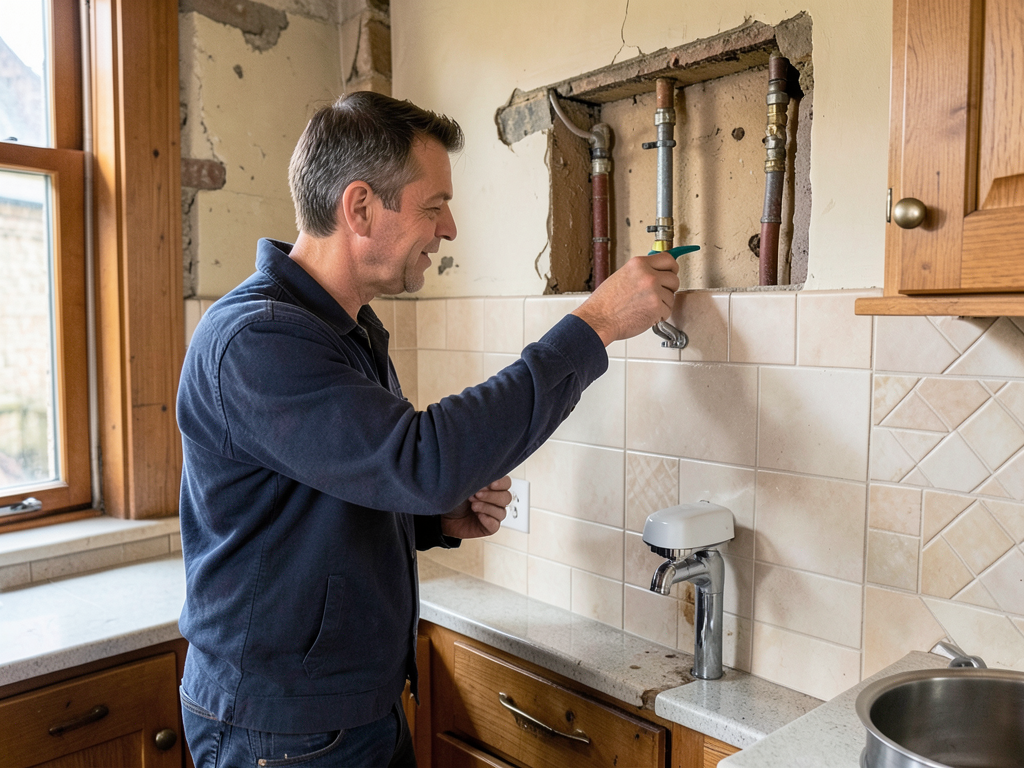
Wall construction challenges in historic Wood Streets homes
Many Wood Streets homes feature lath and plaster walls that require different mounting techniques than modern drywall. The plaster can crack easily if you don’t use the proper anchors and drilling techniques. Additionally older homes often have multiple layers of paint and wallpaper that can hide structural issues like water damage or termite damage that need to be addressed before mounting a heavy pot filler.
Exterior walls in these homes may contain asbestos insulation or lead paint depending on the construction era. Any wall modification requires proper safety protocols and potentially specialized contractors for hazardous material handling. The cost of proper abatement can significantly impact your overall project budget.
Water line routing and access considerations
Running new water lines for a pot filler in a Wood Streets kitchen often means working within confined wall cavities or cutting into original cabinetry. The most common approach involves tapping into the cold water line under the kitchen sink and running a dedicated line up through the wall to the stove area. However this requires careful planning to avoid hitting electrical wiring electrical junction boxes or gas lines that may share the same wall cavity.
The distance from your water source to the pot filler location affects both installation complexity and water delivery time. A long run of pipe means you’ll wait longer for hot water to reach the pot filler if you install a hot water model or experience pressure drop with a cold water only unit. The optimal installation keeps the water source within 6 feet of the pot filler to maintain adequate flow.
Mounting height and backsplash integration
Standard pot filler mounting height is 12 to 18 inches above the cooking surface but this needs adjustment based on your specific range height and backsplash design. Wood Streets kitchens often feature tile or stone backsplashes that require careful drilling to avoid cracking. The mounting bracket must be secured to wall studs rather than just the backsplash material to support the weight of a full pot.
Steam and grease from cooking can affect pot filler operation over time. The valve mechanism needs to be positioned where it won’t accumulate excessive grease buildup yet remains easily accessible for operation. Many homeowners underestimate how much cooking residue can affect the smooth operation of the folding arm mechanism.
Shut-off valve placement and accessibility
California Plumbing Code requires a shut-off valve within 6 feet of any plumbing fixture. For pot fillers this often means installing a dedicated quarter-turn ball valve in an accessible location rather than relying on the main water supply shut-off. The valve should be positioned where you can easily access it for maintenance or emergency shut-off without moving heavy appliances.. Read more about Plumbing layout mistakes to avoid when designing a kitchen island in Magnolia Center.
Hidden shut-off valves behind appliances or inside cabinets create maintenance nightmares. The valve should be visible and easily turned by hand without special tools. This is especially important in Wood Streets homes where the original plumbing may have undocumented modifications that could affect water flow or pressure.
Leak prevention and waterproofing strategies
Water near a cooking surface creates unique leak risks. The installation must include proper waterproofing around the mounting area to prevent water damage to walls and cabinetry. This means using silicone sealant designed for kitchen applications and ensuring all connections are properly tightened and tested before final installation.
Pressure testing the entire system before closing up walls is critical. A small leak behind a stove can cause extensive damage before you notice it. The testing process involves pressurizing the line to 80 PSI and monitoring for pressure drops over 15 minutes to identify any leaks in connections or the pot filler itself.
Cost factors specific to Wood Streets installations
Pot filler installation costs in Wood Streets typically range from $800 to $2500 depending on the complexity of your home’s existing plumbing. Basic installations in homes with accessible plumbing might cost $800 to $1200 while complex retrofits in homes with galvanized pipes or structural issues can exceed $2000.. Read more about Why your historic Victoria Park home might still have cast iron pipes and what that means for you.
Permit fees for Riverside County range from $75 to $150 depending on the scope of work. Additional costs may include wall repair patching painting and potential asbestos abatement if discovered during the installation process. Always budget an additional 15 to 20 percent for unexpected issues common in older homes.
Professional vs DIY installation considerations
DIY pot filler installation might seem appealing but the risks in a Wood Streets home are significant. Improper installation can lead to water damage structural issues and code violations that cost far more to fix than professional installation. Licensed plumbers understand local building codes permit requirements and have the proper tools for working with historic home materials.
Professional installation includes warranty protection and ensures compliance with all local regulations. Most importantly experienced plumbers can identify potential issues before they become expensive problems such as deteriorating pipes or structural concerns that need addressing before any new fixture installation.
Maintenance requirements for long-term performance
Pot fillers require regular maintenance to prevent mineral buildup and ensure smooth operation. Riverside’s hard water means you’ll need to clean the aerator and valve mechanism every 6 to 12 months to prevent flow reduction. The folding arm should be lubricated annually with food-safe silicone to maintain smooth movement.
Check the mounting hardware annually to ensure the bracket remains secure especially if your home experiences foundation movement common in areas with expansive clay soils. Loose mounting can lead to leaks and water damage that are difficult to detect until significant damage occurs.
Choosing the right pot filler for your kitchen style
Pot fillers come in various styles from traditional bridge designs to modern minimalist arms. Your choice should complement your existing fixtures while considering functionality. Double-jointed arms provide better reach and flexibility but require more complex installation. Single-arm designs are simpler but may not reach all burners on larger ranges.
Finish selection affects both aesthetics and maintenance. Chrome and stainless steel resist water spots better than brushed nickel or oil-rubbed bronze but may show fingerprints more readily. Consider your cleaning habits and how visible the fixture will be from other areas of your kitchen.
Energy and water efficiency considerations
Modern pot fillers include flow restrictors that meet current water efficiency standards while still providing adequate flow for filling large pots. Some models include thermostatic mixing valves that allow you to preset water temperature reducing wasted water while waiting for hot water to arrive.
Consider whether you need hot water capability. Cold water pot fillers are simpler and less expensive but require you to heat water separately. Hot water models add complexity but provide convenience for immediate use. The choice affects both installation cost and ongoing energy usage.
Common installation mistakes to avoid
The most frequent installation error is mounting the pot filler too high or too low relative to the cooking surface. This creates splashing issues or makes it difficult to position large pots under the spout. Another common mistake is failing to properly secure the mounting bracket to wall studs leading to instability and potential leaks.
Skipping the pressure test is perhaps the most costly mistake. Small leaks behind walls can cause extensive damage before detection. Always verify all connections hold pressure before completing the installation and closing up any access panels.
Future proofing your kitchen plumbing
Consider future kitchen upgrades when planning your pot filler installation. Running an extra water line during the initial installation costs little more but provides flexibility for future additions like instant hot water dispensers or additional prep sinks. This forward thinking approach can save significant money on future kitchen renovations.
Document all plumbing modifications for future reference. Keep records of pipe locations valve positions and any specialized installation techniques used in your historic home. This information proves invaluable for future repairs or renovations.
Local contractor selection criteria
Choose a plumber familiar with Wood Streets homes and their unique characteristics. Experience with historic home renovations ensures they understand the nuances of working with older construction methods and materials. Verify their California C-36 plumbing license and check references specifically for kitchen fixture installations.
Ask potential contractors about their experience with similar installations in your area. A plumber who has worked on multiple Wood Streets homes will be familiar with common issues like galvanized pipe replacement or dealing with original lath and plaster construction. Dealing with a slab leak in your Canyon Crest home (How to fix it fast).
Permit process and timeline expectations
The permit process for pot filler installation in Riverside typically takes 3 to 5 business days for approval. The actual installation can usually be completed in one day once permits are secured. However scheduling may be affected by seasonal demand with wait times extending during peak home renovation seasons.
Inspections are required both during rough-in and after final installation. The rough-in inspection ensures proper pipe sizing and valve placement while the final inspection verifies all work meets code requirements. Plan for these inspections when scheduling your project timeline.
Insurance and liability considerations
Verify that your contractor carries proper liability insurance and workers compensation coverage. Water damage from improper installation can be extensive and costly. Your homeowner’s insurance may require professional installation for coverage to apply in case of water damage claims.
Ask about warranty coverage for both the fixture and installation work. Quality manufacturers typically offer 5 year warranties on pot fillers while installation warranties vary by contractor. Understand what’s covered and for how long before signing any agreements.
Final preparation checklist
Before your pot filler installation begins verify that your contractor has obtained all necessary permits reviewed your home’s plumbing layout and discussed potential complications specific to your Wood Streets property. Ensure you understand the project timeline payment schedule and warranty terms.
Prepare your kitchen by clearing the work area and protecting surrounding surfaces. Discuss dust containment strategies if you have allergies or respiratory sensitivities. A well prepared homeowner and contractor can ensure a smooth installation process with minimal disruption to your daily routine.
Frequently Asked Questions
How long does pot filler installation typically take in a Wood Streets home?
Most pot filler installations in Wood Streets homes take 4 to 8 hours for the actual plumbing work plus additional time for wall repair and finishing. The total project from start to finish including permits and inspections usually takes 3 to 5 days.
Do I need a permit for pot filler installation in Riverside?
Yes California Plumbing Code and Riverside County require permits for any new plumbing fixture installation regardless of size. Permit fees range from $75 to $150 and ensure the work meets all safety and building code requirements.
Can I install a pot filler on an exterior wall in my Wood Streets home?
Yes but exterior wall installations require additional considerations for freeze protection and proper insulation. The installation must also comply with seismic bracing requirements and may need specialized mounting hardware to account for temperature fluctuations.
Ready to upgrade your Wood Streets kitchen?
Adding a pot filler to your Wood Streets kitchen remodel requires careful planning and professional expertise to ensure proper installation and code compliance. The unique characteristics of historic Riverside homes mean you need a plumber who understands local building codes historic construction methods and the specific challenges of working in established neighborhoods.
Don’t risk water damage or code violations with DIY installation. Call (951) 309-5599 today to schedule your pot filler consultation and get expert advice tailored to your specific Wood Streets home. Our licensed plumbers have years of experience working with historic properties throughout Riverside and can ensure your new fixture adds both convenience and value to your kitchen remodel.
Pick up the phone and call (951) 309-5599 before the next storm hits. Water damage from improper installation can cost thousands to repair and may not be covered by insurance if installed without proper permits. Protect your investment with professional installation from plumbers who know Wood Streets inside and out.
Additional Resources
For more information about kitchen plumbing upgrades and historic home renovations visit the International Code Council website for current building code requirements or the EPA WaterSense program for water efficiency standards.
Learn more about maintaining your home’s plumbing system in our comprehensive guide to common plumbing emergencies and how to prevent costly repairs.
Discover why homeowners in nearby neighborhoods are upgrading their kitchens with modern plumbing solutions that improve efficiency and convenience.
You may also find this helpful. Comparing faucet finishes (Which ones hold up best against Riverside hard water?).